Build a DID Resolver React Application
In this tutorial, you'll create a simple React application that resolves Decentralized Identifiers (DIDs) using the Vidos Universal Resolver API. By the end, you'll have a functional application that can resolve DIDs from different methods and display their associated DID documents.
Prerequisites
Before you begin, make sure you have:
- Basic knowledge of React and JavaScript
- Node.js (v14 or later) and npm installed on your computer
- A Vidos Resolver API Key
- A configured Resolver instance in your Vidos account
What you'll learn
- How to set up a React application for DID resolution
- How to make authenticated API calls to the Vidos Resolver service
- How to display and format DID documents
- How to implement a clean, user-friendly interface for DID resolution
Step 1: Create a new React application
First, create a new React application using Create React App:
- Open your terminal and navigate to the directory where you want to create your project
- Run the following command:
npx create-react-app vidos-resolver-app
- Once the installation completes, navigate to your new project directory:
- Start the development server:
Your browser should open automatically to http://localhost:3000 with the default React application.
Step 2: Create the DID resolution form
Now, let's create a form component that will handle the DID input and resolution:
- Create a new file called
DidResolverForm.js in the src directory
- Add the following code to create a basic form with state management:
import React, { useState } from 'react';

const DidResolverForm = () => {
    // State for storing the input DID and resolved document
    const [did, setDid] = useState('');
    const [didDocument, setDidDocument] = useState(null);
    const [isLoading, setIsLoading] = useState(false);
    const [error, setError] = useState(null);

    // Handle form submission
    const handleSubmit = async (e) => {
        e.preventDefault();

        // Clear previous results and errors
        setDidDocument(null);
        setError(null);
        setIsLoading(true);

        try {
            // We'll implement the API call in the next step
        } catch (error) {
            setError('Error resolving DID. Please check your input and try again.');
            console.error('Error resolving DID:', error);
        } finally {
            setIsLoading(false);
        }
    };

    return (
        <div className="resolver-container">
            <h2>Vidos DID Resolver</h2>
            <form onSubmit={handleSubmit}>
                <div className="input-group">
                    <label htmlFor="did-input">Enter a DID to resolve:</label>
                    <input
                        id="did-input"
                        type="text"
                        placeholder="e.g., did:key:z6MkhaXgBZDvotDkL5257faiztiGiC2QtKLGpbnnEGta2doK"
                        value={did}
                        onChange={(e) => setDid(e.target.value)}
                        required
                    />
                </div>
                <button type="submit" disabled={isLoading || !did.trim()}>
                    {isLoading ? 'Resolving...' : 'Resolve DID'}
                </button>
            </form>

            {/* Show error message if any */}
            {error && <div className="error-message">{error}</div>}

            {/* Display resolved DID document */}
            {didDocument && (
                <div className="did-document">
                    <div className="document-header">
                        <h3>DID Document</h3>
                        <button
                            onClick={() => navigator.clipboard.writeText(JSON.stringify(didDocument, null, 2))}
                            className="copy-button"
                        >
                            Copy JSON
                        </button>
                    </div>
                    <pre>{JSON.stringify(didDocument, null, 2)}</pre>
                </div>
            )}
        </div>
    );
};

export default DidResolverForm;
- Update the
App.js file to use our new component:
import React from 'react';
import './App.css';
import DidResolverForm from './DidResolverForm';

function App() {
    return (
        <div className="App">
            <header className="App-header">
                <h1>Vidos DID Resolution</h1>
            </header>
            <main>
                <DidResolverForm />
            </main>
            <footer>
                <p>Powered by Vidos Universal Resolver</p>
            </footer>
        </div>
    );
}

export default App;
Step 3: Implement the API call
Now let's implement the API call to the Vidos Resolver service. Update the handleSubmit function in your DidResolverForm.js file:
const handleSubmit = async (e) => {
    e.preventDefault();

    // Clear previous results and errors
    setDidDocument(null);
    setError(null);
    setIsLoading(true);

    try {
        // Replace with your actual resolver endpoint and API key
        const resolverEndpoint = 'YOUR_RESOLVER_ENDPOINT';
        const apiKey = 'YOUR_API_KEY';

        // Make the API call
        const response = await fetch(`${resolverEndpoint}/${did}`, {
            headers: {
                Authorization: `Bearer ${apiKey}`,
                Accept: 'application/json',
            },
        });

        // Handle non-200 responses
        if (!response.ok) {
            const errorData = await response.json().catch(() => ({}));
            throw new Error(errorData.message || `HTTP error ${response.status}`);
        }

        // Parse the response
        const data = await response.json();
        setDidDocument(data);
    } catch (error) {
        setError(`Error resolving DID: ${error.message}`);
        console.error('Error details:', error);
    } finally {
        setIsLoading(false);
    }
};
Finding your resolver endpoint
To find your resolver endpoint, go to the Vidos Dashboard and select your resolver instance. The endpoint URL is displayed in the instance details section.
Step 4: Add styling
Let's add some styling to make our application look professional. Create a new file called DidResolverForm.css in the src directory and add the following CSS:
.resolver-container {
    max-width: 800px;
    margin: 0 auto;
    padding: 20px;
}

.input-group {
    margin-bottom: 16px;
}

label {
    display: block;
    margin-bottom: 8px;
    font-weight: 500;
}

input[type='text'] {
    width: 100%;
    padding: 12px;
    border: 1px solid #ddd;
    border-radius: 4px;
    font-size: 16px;
    transition: border-color 0.3s;
}

input[type='text']:focus {
    border-color: #0066cc;
    outline: none;
    box-shadow: 0 0 0 2px rgba(0, 102, 204, 0.2);
}

button {
    background-color: #0066cc;
    color: white;
    border: none;
    padding: 12px 20px;
    border-radius: 4px;
    font-size: 16px;
    cursor: pointer;
    transition: background-color 0.3s;
}

button:hover {
    background-color: #0055a5;
}

button:disabled {
    background-color: #cccccc;
    cursor: not-allowed;
}

.error-message {
    background-color: #ffebee;
    color: #d32f2f;
    padding: 12px;
    border-radius: 4px;
    margin-top: 16px;
    border-left: 4px solid #d32f2f;
}

.did-document {
    margin-top: 24px;
    background-color: #f8f9fa;
    border-radius: 4px;
    border: 1px solid #eaeaea;
}

.document-header {
    padding: 12px 16px;
    border-bottom: 1px solid #eaeaea;
    display: flex;
    justify-content: space-between;
    align-items: center;
}

.document-header h3 {
    margin: 0;
}

.copy-button {
    background-color: transparent;
    color: #0066cc;
    padding: 6px 12px;
    border: 1px solid #0066cc;
}

.copy-button:hover {
    background-color: rgba(0, 102, 204, 0.1);
}

pre {
    margin: 0;
    padding: 16px;
    overflow-x: auto;
    font-family: 'SFMono-Regular', Consolas, 'Liberation Mono', Menlo, monospace;
    font-size: 14px;
    line-height: 1.5;
}
Then import this CSS file in your DidResolverForm.js:
import React, { useState } from 'react';
import './DidResolverForm.css';

// Rest of your component code...
Also, update your App.css with some basic styling:
.App {
    min-height: 100vh;
    display: flex;
    flex-direction: column;
}

.App-header {
    background-color: #f8f9fa;
    padding: 20px;
    border-bottom: 1px solid #eaeaea;
    text-align: center;
}

.App-header h1 {
    margin: 0;
    color: #333;
    font-size: 1.8rem;
}

main {
    flex: 1;
    padding: 20px;
}

footer {
    padding: 20px;
    text-align: center;
    background-color: #f8f9fa;
    border-top: 1px solid #eaeaea;
    color: #666;
}
Step 5: Add example DIDs
To help users get started, let's add some example DIDs they can try. Update your DidResolverForm.js to include example buttons:
import React, { useState } from 'react';
import './DidResolverForm.css';

const DidResolverForm = () => {
    // Existing state variables...

    // Example DIDs
    const exampleDids = [
        'did:key:z6MkhaXgBZDvotDkL5257faiztiGiC2QtKLGpbnnEGta2doK',
        'did:web:w3c-ccg.github.io',
        'did:ion:EiClkZMDxPKqC9c-umQfTkR8vvZ9JPhl_xLDI9Nfk38w5w',
    ];

    // Function to set an example DID
    const setExampleDid = (example) => {
        setDid(example);
    };

    // Rest of your component code...

    return (
        <div className="resolver-container">
            <h2>Vidos DID Resolver</h2>

            {/* Example DIDs section */}
            <div className="example-dids">
                <p>Try an example DID:</p>
                <div className="example-buttons">
                    {exampleDids.map((example, index) => (
                        <button
                            key={index}
                            type="button"
                            className="example-button"
                            onClick={() => setExampleDid(example)}
                        >
                            {example.split(':').slice(0, 2).join(':')}
                        </button>
                    ))}
                </div>
            </div>

            {/* Existing form code... */}
        </div>
    );
};
Add some additional styling for the example DIDs section in your CSS file:
.example-dids {
    margin-bottom: 24px;
}

.example-dids p {
    margin-bottom: 8px;
    font-size: 14px;
    color: #666;
}

.example-buttons {
    display: flex;
    flex-wrap: wrap;
    gap: 8px;
}

.example-button {
    background-color: #f0f0f0;
    color: #333;
    border: 1px solid #ddd;
    padding: 8px 12px;
    font-size: 14px;
}

.example-button:hover {
    background-color: #e0e0e0;
}
Step 6: Add loading state indicator
Let's improve the user experience by adding a loading indicator. Update your DidResolverForm.js:
// Add a loading state component
const LoadingSpinner = () => (
    <div className="loading-spinner">
        <div className="spinner"></div>
        <p>Resolving DID...</p>
    </div>
);

const DidResolverForm = () => {
    // Existing code...

    return (
        <div className="resolver-container">
            {/* Existing code... */}

            {/* Add this loader */}
            {isLoading && <LoadingSpinner />}

            {/* Rest of your component */}
        </div>
    );
};
Add the corresponding CSS for the loading spinner:
.loading-spinner {
    display: flex;
    flex-direction: column;
    align-items: center;
    margin: 24px 0;
}

.loading-spinner p {
    margin-top: 12px;
    color: #666;
}

.spinner {
    border: 4px solid rgba(0, 0, 0, 0.1);
    border-radius: 50%;
    border-top: 4px solid #0066cc;
    width: 40px;
    height: 40px;
    animation: spin 1s linear infinite;
}

@keyframes spin {
    0% {
        transform: rotate(0deg);
    }
    100% {
        transform: rotate(360deg);
    }
}
Step 7: Final touches and testing
Let's add one final improvement - a visual indicator for successfully copied text:
// Add state for copy button
const [copied, setCopied] = useState(false);

// Updated copy function
const copyToClipboard = () => {
    navigator.clipboard.writeText(JSON.stringify(didDocument, null, 2));
    setCopied(true);
    setTimeout(() => setCopied(false), 2000);
};

// In your didDocument section:
<button onClick={copyToClipboard} className="copy-button">
    {copied ? 'Copied!' : 'Copy JSON'}
</button>;
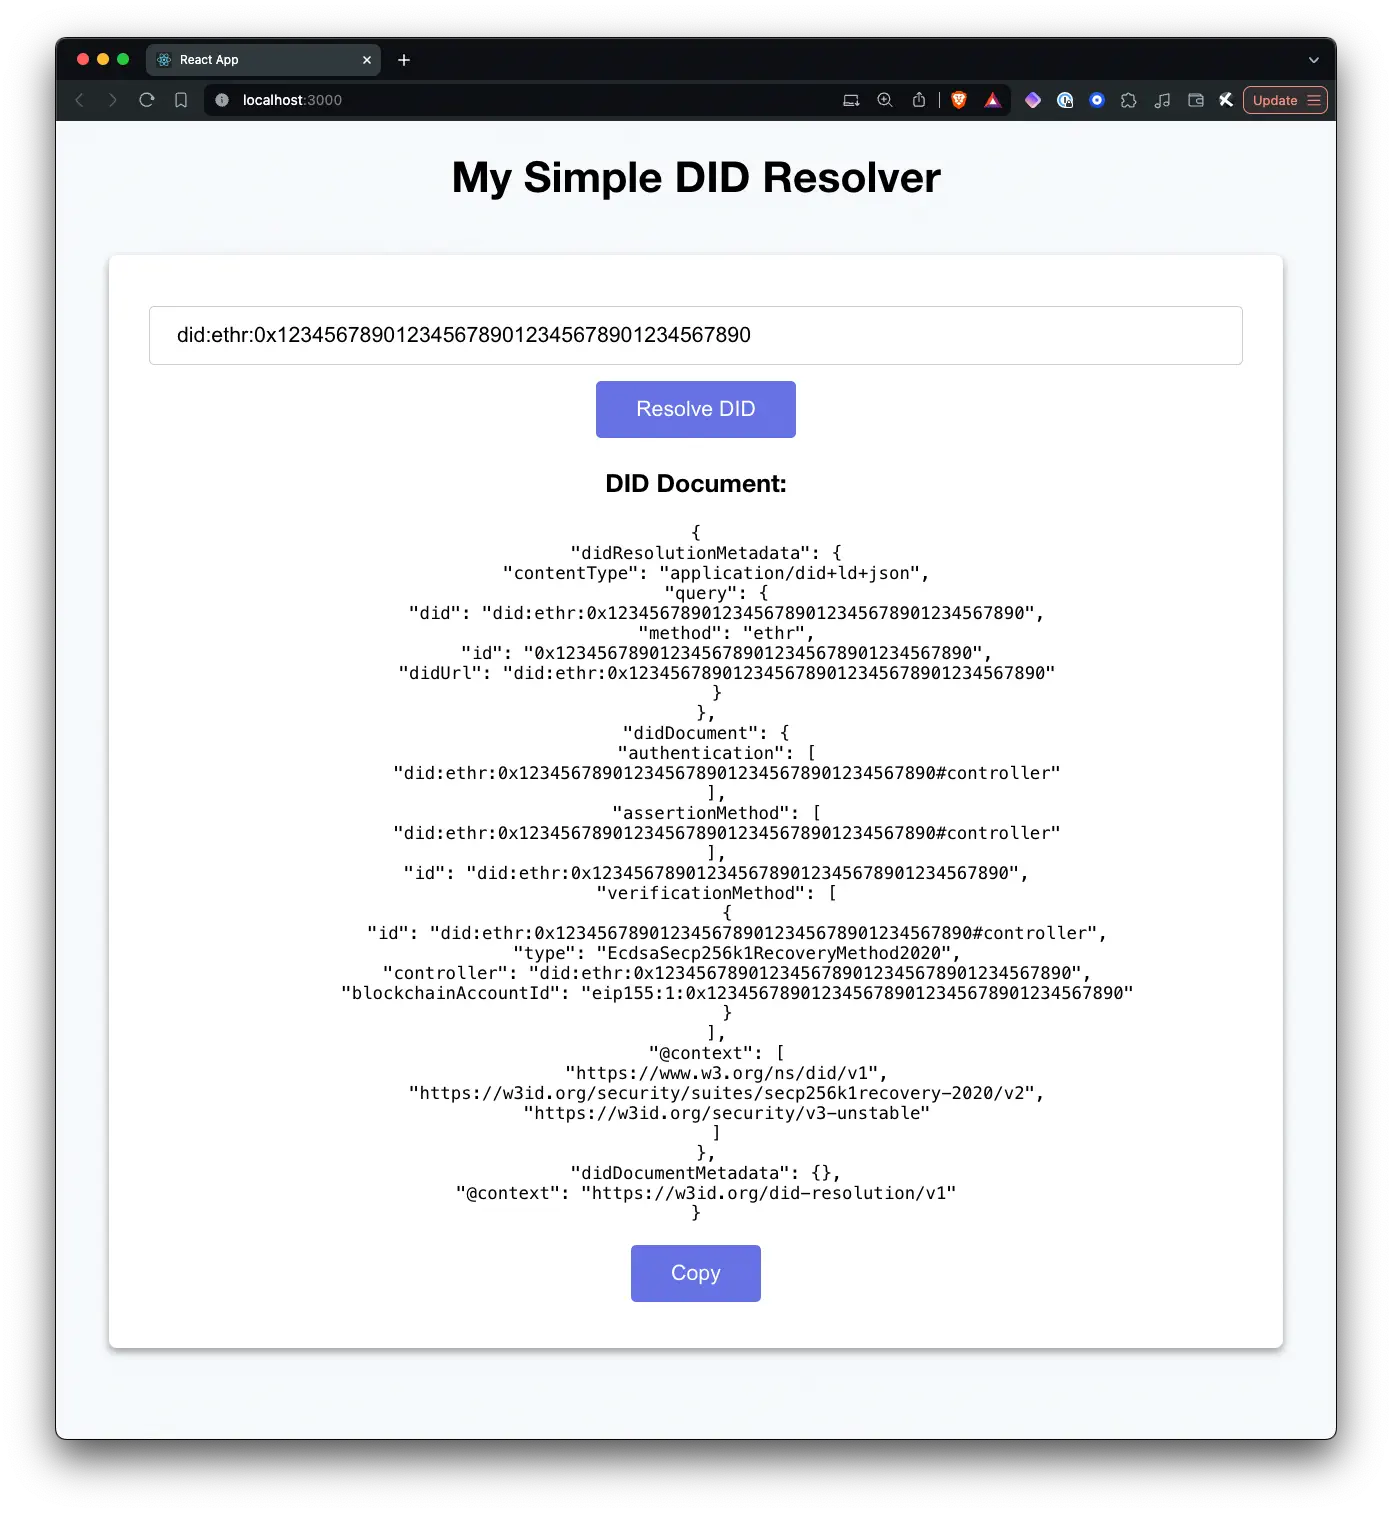
Now test your application by:
- Starting your development server with
npm start if it's not already running
- Entering a valid DID in the input field or clicking one of the example DIDs
- Clicking the "Resolve DID" button
- Verifying that the DID document is correctly displayed
- Testing the copy functionality
What you've learned
In this tutorial, you've learned how to:
- Create a React application that interacts with the Vidos Universal Resolver
- Make authenticated API calls to the Resolver service
- Handle and display DID resolution results
- Implement user-friendly features like loading states and example inputs
- Style your application for a professional look and feel
Next steps
Now that you have a basic DID resolver application, you can enhance it with additional features:
- Add support for DID URL dereferencing
- Implement tabs to display different parts of the DID document separately
- Add a history of recently resolved DIDs
- Integrate with other Vidos services like the Verifier
- Add error handling for specific DID method errors
In the next tutorial, we'll explore how to analyze and use the data from the DID document in your applications.